折り畳み可能なリストを作る
今回は折り畳みが可能なリストの作り方をご紹介します。
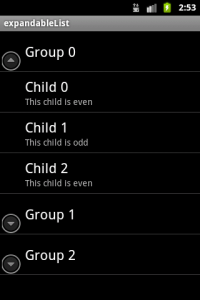
図のように親リストの項目を選択すると子のリストが表示されます。
詳細は続きからどうぞ。
折り畳み可能なリストはExpandableListAdapterクラスを継承して作ります。
public class expandableList extends ExpandableListActivity
続いて、親と子のリストに表示するメニュー項目を定義します。
// 親リスト
List<Map<String, String>> groupData = new ArrayList<Map<String, String>>();
// 子リスト
List<List<Map<String, String>>> childData = new ArrayList<List<Map<String, String>>>();

// 親リストの項目は3つ
for (int i = 0; i < 3; i++) {
	// 親リストの項目用のMap変数
	Map<String, String> curGroupMap = new HashMap<String, String>();
	groupData.add(curGroupMap);
	// タイトルを設定する
	curGroupMap.put("TITLE", "Group " + i);

	// 子リストを作成
	List<Map<String, String>> children = new ArrayList<Map<String, String>>();
	// 子リストの項目を作成。各子リストに3つの項目を作成する。
	for (int j = 0; j < 3; j++) {
		// 子リストの項目用のMap変数
		Map<String, String> curChildMap = new HashMap<String, String>();
		children.add(curChildMap);
		// タイトルを設定
		curChildMap.put("TITLE", "Child " + j);
		// サマリーを設定する
		curChildMap.put("SUMMARY", (j % 2 == 0) ? "This child is even" : "This child is odd");
	}

	// 子リストを設定
	childData.add(children);
}
最後にアダプタにリストを設定すれば完了です。
親/子それぞれのリスト用のレイアウトやリストで表示する項目のキーなどを設定します。
// ExpandableList用のAdapter
private ExpandableListAdapter mAdapter;

// アダプタを作成
mAdapter = new SimpleExpandableListAdapter(

		// コンテキスト
		this,

		// 親リスト
		groupData,

		// 親リスト用のレイアウト
		android.R.layout.simple_expandable_list_item_1,

		// 親リストで表示する項目のキー
		new String[] { "TITLE" },

		// 親リストレイアウト内で文字を表示するTextViewのID
		new int[] { android.R.id.text1,	android.R.id.text2 },

		// 子リスト
		childData,

		// 子リスト用のレイアウト
		android.R.layout.simple_expandable_list_item_2,

		// 子リストで表示する項目のキー
		new String[] { "TITLE", "SUMMARY" },

		// 子リストレイアウト内で文字を表示するTextViewのID
		new int[] { android.R.id.text1,	android.R.id.text2 }
	);

// アダプタにリストを設定
setListAdapter(mAdapter);
}
