TextViewの使い方 / Getting Started
どんなアプリケーションを作成する時でも、必ずどこかでテキストを表示すると思います。
本エントリでは、Androidでテキスト表示を行う際には欠かせないViewである、
TextViewの利用方法についてLayoutファイルへの記述とソースコード上での記述を比較しながら
紹介していきたいと思います。
よく使われるTextViewクラスのメソッドは以下表の内容になります。
| メソッド名 | 説明 |
|---|---|
| TextViewクラスのsetTextメソッド | 表示するテキストデータを指定するときに使用します。 |
| TextViewクラスのsetTextSizeメソッド | 表示するテキストデータのサイズを指定するときに使用します。 |
| TextViewクラスのsetTextColorメソッド | 表示するテキストデータの色を指定するときに指定します |
| TextViewクラスのsetGravityメソッド | 表示するテキストデータの表示位置(左寄せ、右寄せなど)を指定するときに使用します。 |
| TextViewクラスのsetCompoundDrawablesメソッド | TextViewに付随させる画像イメージを表示するときに使用します。上下左右に画像を付加することができます。 |
| TextViewクラスのsetTypefaceメソッド | 表示するテキストデータのフォントやスタイル(BOLD、ITALICなど)を指定するときに使用します。 |
また、上記TextViewクラスメソッド以外にも下記メソッドを使用しています。
| メソッド名 | 説明 |
|---|---|
| ViewクラスのsetBackGroundColorメソッド | Viewのバックグラウンドの色(背景色)を指定するときに使用します。主なGUIコンポーネントはViewクラスを継承しているため、様々なコンポーネントに対し使用することができます。 |
| ContentWrapperクラスのgetResourcesメソッド | Resourceのオブジェクトを取得するときに使用するメソッド。ContentWrapperクラスはContextクラスを継承しており、Activityクラスから呼び出す事が可能です。 |
| ResourcesクラスのgetDrawableメソッド | アプリケーションのパッケージ内、drawableディレクトリに保存しているデータにアクセスするときに使用します。 |
以上のメソッドについて、本エントリでは紹介していきます。
それでは続きをどうぞ
表示テキストの指定
表示するテキストの指定にはTextViewクラスのsetTextメソッドを使用します。
Layoutファイルで指定する時にはandroid:text要素に行います。
テキストの指定
| ソースコードの場合 | レイアウトファイルの場合 |
|---|---|
| setText(String text) | android:text="@string/hoge” (android:text="直接Stringを書いても可" |
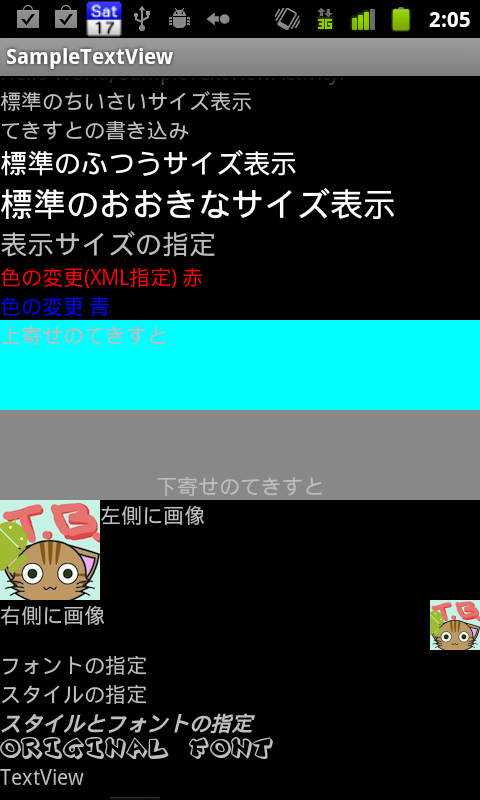
サンプルでは、以下のように指定しています。
ソースコードの場合
■src/SampleTextViewActivity.java
        // 2つ目のTextView
        // テキストの設定
        TextView textSetting = (TextView)findViewById(R.id.textSetting);
        textSetting.setText("てきすとの書き込み");
レイアウトファイルの場合
■res/layout/main.xml
		<TextView android:layout_width="fill_parent" android:id="@+id/DefaultTextView"
			android:layout_height="wrap_content" android:text="@string/hello" />
テキストサイズの設定
表示するテキストのサイズの指定方法には、2種類の方法があります。
一つ目は、Android SDKが用意しているスタイルを使用する方法です。
用意されたスタイルを使用するときは、Layoutファイルでandroid:textApperarance要素を指定します。
指定する内容は以下の表の通りです。
| 要素 | 説明 |
|---|---|
| android:textAppearance="?android:attr/textAppearanceSmall" | 小さいサイズで表示する |
| android:textAppearance="?android:attr/textAppearanceMedium" | 普通のサイズで表示する |
| android:textAppearance="?android:attr/textAppearanceLarge" | 大きなサイズで表示する |
レイアウトファイルの指定方法は以下とおり。
■res/layout/main.xml
		<TextView android:text="@string/small_text" android:id="@+id/SmallTextView"
			android:layout_height="wrap_content" android:layout_width="fill_parent"
			android:textAppearance="?android:attr/textAppearanceSmall"></TextView>
		<TextView android:id="@+id/MediumTextView"
			android:textAppearance="?android:attr/textAppearanceMedium"
			android:text="@string/medium_text" android:layout_width="fill_parent"
			android:layout_height="wrap_content"></TextView>
		<TextView android:id="@+id/LargeTextView"
			android:textAppearance="?android:attr/textAppearanceLarge"
			android:text="@string/large_text" android:layout_width="fill_parent"
			android:layout_height="wrap_content"></TextView>
二つ目の方法は、テキストサイズの指定を行う方法です。
テキストサイズの指定は、TextViewクラスのsetTextSize()メソッドを使用するか、
Layoutファイルでandroid:textSizeを使用します。
サイズ指定
| ソースコードの場合 | レイアウトファイルの場合 |
|---|---|
| setTextSize(float size) | android:textSize="●dip" (android:textSize="50dip"など) |
サンプルでは以下のように指定しています。
ソースコードで指定
■src/SampleTextViewActivity.java
        // 6つ目のTextView
        // テキストサイズの変更 (XMLで指定するときは -> android:textSize)
        TextView sizeEdit = (TextView)findViewById(R.id.editSize);
        sizeEdit.setTextSize(18.0f);
色の指定
表示するテキストの色の指定には、TextViewクラスのsetTextColorメソッドを使用します。
また、レイアウトファイルで指定する場合には、android:textColor要素を使用します。
レイアウトファイルでの指定には、ARGBの形で指定するか、”@Color/hoge”の形で指定します。
ARGBとは?
ARGBとは、RGB(Red,Green,Blue)の色の数値指定(0〜255)と透明度(Alfa)の数値指定(透明:0 〜 255:非透明)を行うことで
色の指定をする方式です。
| ソースコードで指定する場合 | レイアウトファイルで指定する場合 |
|---|---|
| setTextColor(int color) | android:textColor="#FFff0000"(ARGBで指定) |
サンプルでは以下のように指定しています。
TextViewクラスのsetTextColorには、引数にint型(ARGB,RGB)の型で指定を行うメソッドと
Colorクラスから指定するメソッドの二種類が用意されています。
ソースコードで指定
■src/SampleTextViewActivity.java
        // 8つ目のTextView
        // 色の指定
        TextView colorEdit = (TextView)findViewById(R.id.editColor);
        colorEdit.setTextColor(Color.BLUE);
        // colorEdit.setTextColor(0xFF0000ff);
レイアウトファイルで指定
■res/layout/main.xml
		<TextView android:text="@string/edit_color_xml" android:id="@+id/editColorXML"
			android:textColor="#FFff0000" android:layout_width="fill_parent"
			android:layout_height="wrap_content"></TextView>
テキストの表示位置と背景色の設定
テキストの表示位置の設定には、TextViewクラスのsetGravityメソッドを使用します。
また、レイアウトファイルで指定する場合には、android:gravity要素を使用します。
| ソースコードで指定 | レイアウトファイルで指定 |
|---|---|
| setGravity(int gravity) | android:gravity="top" |
gravityとして指定できる内容は以下の表のとおりです。
| Gravityクラスのメンバ変数 | 用途 |
|---|---|
| BOTTOM | 要素を下方向に寄せる |
| CENTER | 要素をViewの真ん中に寄せる |
| CENTER_HORIZONTAL | 要素をViewの横幅の真ん中に寄せる |
| CENTER_VERTICAL | 要素をViewの縦幅の真ん中に寄せる |
| LEFT | 要素を左方向に寄せる |
| RIGHT | 要素を右方向に寄せる |
| TOP | 要素を上方向に寄せる |
背景色の設定には、TextViewクラスのsetBackgroundColorメソッドを使用します。
引数には、Colorクラスのメンバ変数を指定することができます。
指定できる内容は以下表のとおり。
| 要素 | 説明 |
|---|---|
| BLACK | 黒色 |
| BLUE | 青色 |
| CYAN | 水色 |
| DKGRAY | 濃い灰色 |
| GRAY | 灰色 |
| GREEN | 緑色 |
| LTGRAY | 明るい灰色 |
| MAGENTA | 赤紫色 |
| RED | 赤色 |
| TRANSPARENT | 透明色 |
| WHITE | 白色 |
| YELLOW | 黄色 |
サンプルでは以下のように指定しています。
上記図の内容を重ねて利用する為に、”Gravity.BOTTOM|Gravity.CENTER_HORIZONTAL”という形を指定しています。
ソースコードでの指定
■src/SampleTextViewActivity.java
        // 10個目のTextView
        // 下寄せ 中央 背景灰色
        TextView bottomText = (TextView)findViewById(R.id.down);
        bottomText.setGravity(Gravity.BOTTOM|Gravity.CENTER_HORIZONTAL);
        bottomText.setBackgroundColor(Color.GRAY);
レイアウトファイルでの指定
		<TextView android:text="@string/up" android:id="@+id/up"
			android:gravity="top" android:background="@color/aqua"
			android:layout_width="fill_parent" android:layout_height="60dip"></TextView>
画像を含んだTextView
ImageViewとTextViewを使用して、画像とテキストを並べることがよくありますが、
TextViewだけで実現することも可能です。
画像を含んだTextViewを使用するためには、TextViewクラスのsetCompoundDrawablesメソッドを使用するか、
レイアウトファイルでandroid:drawableHogeの要素を使用します。
| ソースコードで指定する | レイアウトファイルで指定する |
|
|---|---|---|
| setCompoundDrawables(Drawable left,Drawable top,Drawable right,Drawable bottom) | android:drawableLeft | 左側に表示する |
| android:drawableTop | 上側に表示する | |
| android:drawableRight | 右側に表示する | |
| android:drawableBottom | 下側に表示する | |
サンプルでは、以下のように記述しています。
res/drawableディレクトリに置いている、画像情報をDrawableクラスオブジェクトとして読み込む為に
ContentWrapperクラスのgetResourcesメソッドと、ResourcesクラスのgetDrawableメソッドを利用しています。
ソースコードで指定する場合
■src/SampleTextViewActivity.java
        // 12個目のTextView
        // 右側に画像表示
        Drawable image = getResources().getDrawable(R.drawable.tb);
        image.setBounds(0, 0, 50, 50);
        TextView right_image = (TextView)findViewById(R.id.right_image);
        right_image.setCompoundDrawables(null, null, image, null);
レイアウトファイルで指定する場合
		<TextView android:text="@string/left_image" android:id="@+id/left_image" android:drawableLeft="@drawable/tb"
			android:layout_width="fill_parent" android:layout_height="wrap_content"></TextView>
スタイルとフォントの設定
TextViewにはBOLDやITALICなどのスタイルの設定やフォントの設定などが行えます。
設定には、TextViewクラスのsetTypefaceメソッドにTypefaceクラスのメンバ変数(以下表の内容)を使用して行います。
| メンバ変数 | 内容 |
|---|---|
| int BOLD | 太字 |
| int BOLD_ITALIC | 太字斜体 |
| int ITALIC | 斜体 |
| int NORMAL | 通常書体 |
| public static final Typeface DEFAULT | 標準のスタイル |
| public static final Typeface DEFAULT_BOLD | 標準の太字時スタイル |
| public static final Typeface MONOSPACE | 等幅フォントスタイル |
| public static final Typeface SANS_SERIF | ゴシック系フォントスタイル |
| public static final Typeface SERIF | 明朝系フォントスタイル |
サンプルでは以下のように使用しています。
        // 13個目のTextView
        // フォントとスタイルの変更
		TextView styleAndFont = (TextView) findViewById(R.id.style_and_font);
		styleAndFont.setTypeface(Typeface.MONOSPACE,Typeface.ITALIC|Typeface.BOLD);
また、標準のフォントを使用する以外に、独自のフォントを読み込むこともできます。
プロジェクト内assetsディレクトリに保存されている独自フォントの読み込みには、
上記と同様にTextViewクラスのsetTypefaceメソッドを使用します。
下記サンプルを見てください。引数にTypefaceクラスのcreateFromAssetを呼び出し使用するフォントを指定しています。
■src/SampleTextViewActivity.java
		// 14個目のTextView
		// Origin Font
		// ApplicationのAssetManagerを引き渡す
		TextView origin_font = (TextView) findViewById(R.id.origin_font);
		origin_font.setTypeface(Typeface.createFromAsset(getAssets(), "plok.ttf"));
最後に一連のソースコードを引用します。
■src/SampleTextViewActivity.java
    public void onCreate(Bundle savedInstanceState) {
        super.onCreate(savedInstanceState);
        setContentView(R.layout.main);

        // 1つ目のTextView
        // default TextView
        // @+id/defaultTextView

        // 2つ目のTextView
        // テキストの設定
        TextView textSetting = (TextView)findViewById(R.id.textSetting);
        textSetting.setText("てきすとの書き込み");

        // 3つ目のTextView(XML)
        // テキストサイズの指定(用意されたスタイルを使用) Small

        // 4つ目のTextView(XML)
        // テキストサイズの指定(用意されたスタイルを使用) Middle

        // 5つ目のTextView(XML)
        // テキストサイズの指定(用意されたスタイルを使用) Large

        // 6つ目のTextView
        // テキストサイズの変更 (XMLで指定するときは -> android:textSize)
        TextView sizeEdit = (TextView)findViewById(R.id.editSize);
        sizeEdit.setTextSize(18.0f);

        // 7つ目のTextView
        // 色の指定(XML)

        // 8つ目のTextView
        // 色の指定
        TextView colorEdit = (TextView)findViewById(R.id.editColor);
        colorEdit.setTextColor(Color.BLUE);

        // 9つ目のTextView
        // 上寄せ 背景水色(XML)

        // 10個目のTextView
        // 下寄せ 中央 背景灰色
        TextView bottomText = (TextView)findViewById(R.id.down);
        bottomText.setGravity(Gravity.BOTTOM|Gravity.CENTER_HORIZONTAL);
        bottomText.setBackgroundColor(Color.GRAY);

        // 11個目のTextView
        // 左側に画像表示(XML)

        // 12個目のTextView
        // 右側に画像表示
        Drawable image = getResources().getDrawable(R.drawable.tb);
        image.setBounds(0, 0, 50, 50);
        TextView right_image = (TextView)findViewById(R.id.right_image);
        right_image.setCompoundDrawables(null, null, image, null);


        // 13個目のTextView
        // フォントとスタイルの変更
		TextView styleAndFont = (TextView) findViewById(R.id.style_and_font);
		styleAndFont.setTypeface(Typeface.MONOSPACE,Typeface.ITALIC|Typeface.BOLD);

		// 14個目のTextView
		// Origin Font
		// ApplicationのAssetManagerを引き渡す
		TextView origin_font = (TextView) findViewById(R.id.origin_font);
		origin_font.setTypeface(Typeface.createFromAsset(getAssets(), "plok.ttf"));

	}
■res/layout/main.xml
<ScrollView android:id="@+id/scrollView1"
	xmlns:android="http://schemas.android.com/apk/res/android"
	android:layout_width="match_parent" android:layout_height="match_parent">
	<LinearLayout android:orientation="vertical"
		android:layout_width="fill_parent" android:layout_height="fill_parent">

		<TextView android:layout_width="fill_parent" android:id="@+id/DefaultTextView"
			android:layout_height="wrap_content" android:text="@string/hello" />
		<TextView android:text="@string/small_text" android:id="@+id/SmallTextView"
			android:layout_height="wrap_content" android:layout_width="fill_parent"
			android:textAppearance="?android:attr/textAppearanceSmall"></TextView>
		<TextView android:id="@+id/textSetting" android:layout_width="fill_parent"
			android:layout_height="wrap_content"></TextView>
		<TextView android:id="@+id/MediumTextView"
			android:textAppearance="?android:attr/textAppearanceMedium"
			android:text="@string/medium_text" android:layout_width="fill_parent"
			android:layout_height="wrap_content"></TextView>
		<TextView android:id="@+id/LargeTextView"
			android:textAppearance="?android:attr/textAppearanceLarge"
			android:text="@string/large_text" android:layout_width="fill_parent"
			android:layout_height="wrap_content"></TextView>
		<TextView android:text="@string/edit_size" android:id="@+id/editSize"
			android:layout_width="fill_parent" android:layout_height="wrap_content"></TextView>
		<TextView android:text="@string/edit_color_xml" android:id="@+id/editColorXML"
			android:textColor="#FFff0000" android:layout_width="fill_parent"
			android:layout_height="wrap_content"></TextView>
		<TextView android:text="@string/edit_color" android:id="@+id/editColor"
			android:layout_width="fill_parent" android:layout_height="wrap_content"></TextView>


		<TextView android:text="@string/up" android:id="@+id/up"
			android:gravity="top" android:background="@color/aqua"
			android:layout_width="fill_parent" android:layout_height="60dip"></TextView>
		<TextView android:text="@string/down" android:id="@+id/down"
			android:layout_width="fill_parent" android:layout_height="60dip"></TextView>

		<TextView android:text="@string/left_image" android:id="@+id/left_image" android:drawableLeft="@drawable/tb"
			android:layout_width="fill_parent" android:layout_height="wrap_content"></TextView>
		<TextView android:text="@string/right_image" android:id="@+id/right_image"
			android:layout_width="fill_parent" android:layout_height="wrap_content"></TextView>

		<TextView android:text="@string/style_and_font" android:id="@+id/style_and_font"
			android:layout_width="fill_parent" android:layout_height="wrap_content"></TextView>
		<TextView android:text="@string/origin_font" android:id="@+id/origin_font"
			android:layout_width="fill_parent" android:layout_height="wrap_content"></TextView>
	</LinearLayout>
</ScrollView>
