データを簡単に保存する方法(SQLite編)
Androidでデータを保存する方法として「Preference」の使い方を7/1の記事で紹介しました。 今回は組み込み機器向けのリレーショナルデータベース管理システムである「SQLite」を使ったデータの保存方法についてご紹介します。 詳細は続きからどうぞ。 SQLiteは上で述べたように主に組み込み機器での使用を想定したコンパクトなデータベース管理システムです。 各アプリケーションのディレクトリ以下に指定したファイル名でデータベースの実体であるファイルが作成されます。
SQLiteOpenHelper
データベースのオープン処理はSQLiteOpenHelperというヘルパークラスを使います。 実際にはSQLiteOpenHelperを継承したクラスを定義することになります。
static final String DB = "sqlite_sample.db";
static final int DB_VERSION = 1;
static final String CREATE_TABLE = "create table mytable ( _id integer primary key autoincrement, data integer not null );";
static final String DROP_TABLE = "drop table mytable;";

private static class MySQLiteOpenHelper extends SQLiteOpenHelper {
	public MySQLiteOpenHelper(Context c) {
		super(c, DB, null, DB_VERSION);
	}
	public void onCreate(SQLiteDatabase db) {
		db.execSQL(CREATE_TABLE);
	}
	public void onUpgrade(SQLiteDatabase db, int oldVersion, int newVersion) {
		db.execSQL(DROP_TABLE);
		onCreate(db);
	}
}
データベースが存在しない状態でデータベースをオープンしようとするとonCreateメソッドが呼ばれます。 この際、onCreateメソッドの引数には新規作成されたデータベースのインスタンスが渡されますので、 このインスタンスのexecSQLを使ってテーブルの作成を行います。 この例では_idという名前の自動連番にdataという名前の数値データを格納するテーブル(mytableという名前)を作成しています。 また、SQLiteOpenHelperはデータベースのバージョン情報を保持しています。 テーブルのバージョンが更新された場合はこのバージョンも更新されます。 このバージョンはSQLiteOpenHelperのコンストラクタで引数として与えるようになっており、 もし与えられたバージョン情報と実際に存在するデータベースのバージョンが異なる場合はonUpgradeメソッドが呼び出されます。 onUpgradeメソッドではテーブル構造の再構成などの処理を行います。
データベースのオープン処理
では、このクラスを使ってデータベースをオープンします。
static SQLiteDatabase mydb;

MySQLiteOpenHelper hlpr = new MySQLiteOpenHelper(getApplicationContext());
mydb = hlpr.getWritableDatabase();
データベースを読み書きするときにはgetWritableDatabase()を呼び出し、 読み取り専用で良い場合はgetReadableDatabase()を呼び出します。
行の挿入
行の挿入はinsertメソッドで行います。 引数と戻り値は以下のようになっています。
long insert(String table, String nullColumnHack, ContentValues values)
各フィールドのデータはContentValuesクラスを使って設定します。 使い方としては以下のようになります。
ContentValues values = new ContentValues();
values.put("data", "data1");
mydb.insert("mytable", null, values);
この例ではdataというフィールドがdata1の行を挿入しています。
行の検索
行の検索にはqueryメソッドを使います。 引数と戻り値は以下のようになっています。
Cursor query(boolean distinct, String table, String[] columns, String selection, String[] selectionArgs, String groupBy, String having, String orderBy, String limit)
たとえば、上で定義したmytableテーブルから全データを検索したい場合は以下のようにします。
Cursor cursor = mydb.query("mytable", new String[] {"_id", "data"}, null, null, null, null, "_id DESC");
行の削除
行の検索にはdeleteメソッドを使います。 引数と戻り値は以下のようになっています。
int delete(String table, String whereClause, String[] whereArgs)
mytableテーブルのデータを全削除するには以下のようにします。
mydb.delete("mytable", "_id like '%'", null);
サンプルコード
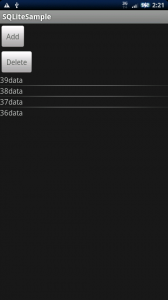
上記の内容をまとめたサンプルコードをご紹介します。 追加ボタンを押すとデータが追加され、削除ボタンを押すと全てのデータが削除されます。 
package org.jpn.techbooster.SQLiteSample;

import android.app.Activity;
import android.os.Bundle;
import android.content.Context;
import android.database.sqlite.SQLiteDatabase;
import android.database.sqlite.SQLiteOpenHelper;
import android.database.Cursor;
import android.widget.SimpleCursorAdapter;
import android.view.View;
import android.content.ContentValues;
import android.widget.Button;
import android.widget.ListView;
import android.view.View.OnClickListener;

public class SQLiteSample extends Activity implements OnClickListener {
	static final String DB = "sqlite_sample.db";
	static final int DB_VERSION = 1;
	static final String CREATE_TABLE = "create table mytable ( _id integer primary key autoincrement, data integer not null );";
	static final String DROP_TABLE = "drop table mytable;";

	static SQLiteDatabase mydb;

	private SimpleCursorAdapter myadapter;

	private ListView listview;
	private Button addbtn, delbtn;

	/** Called when the activity is first created. */
    @Override
    public void onCreate(Bundle savedInstanceState) {
        super.onCreate(savedInstanceState);
        setContentView(R.layout.main);

        MySQLiteOpenHelper hlpr = new MySQLiteOpenHelper(getApplicationContext());
        mydb = hlpr.getWritableDatabase();

        Cursor cursor = mydb.query("mytable", new String[] {"_id", "data"}, null, null, null, null, "_id DESC");
        String[] from = new String[] {"_id", "data"};
        int[] to = new int[] {R.id._id, R.id.data};
        myadapter = new SimpleCursorAdapter(this, R.layout.db_data, cursor, from, to);

        listview = (ListView)findViewById(R.id.ListView);
        listview.setAdapter(myadapter);

        addbtn = (Button)findViewById(R.id.Add);
        addbtn.setOnClickListener(this);
        delbtn = (Button)findViewById(R.id.Delete);
        delbtn.setOnClickListener(this);

    }

    private static class MySQLiteOpenHelper extends SQLiteOpenHelper {
    	public MySQLiteOpenHelper(Context c) {
    		super(c, DB, null, DB_VERSION);
    	}
    	public void onCreate(SQLiteDatabase db) {
    		db.execSQL(CREATE_TABLE);
    	}
    	public void onUpgrade(SQLiteDatabase db, int oldVersion, int newVersion) {
    		db.execSQL(DROP_TABLE);
    		onCreate(db);
    	}
    }

    public void onClick(View view) {
    	if (view.getId() == R.id.Add) {
    		ContentValues values = new ContentValues();
    		values.put("data", "data");
    		mydb.insert("mytable", null, values);

            Cursor cursor = mydb.query("mytable", new String[] {"_id", "data"}, null, null, null, null, "_id DESC");
            startManagingCursor(cursor);
            myadapter.changeCursor(cursor);
    	} else if (view.getId() == R.id.Delete) {
    		mydb.delete("mytable", "_id like '%'", null);

            Cursor cursor = mydb.query("mytable", new String[] {"_id", "data"}, null, null, null, null, "_id DESC");
            startManagingCursor(cursor);
            myadapter.changeCursor(cursor);
    	}
    }
}