Chrome Custom Tabsを使いこなす
Chrome 45から導入されたCustom Tabs機能は、アプリ内のWebページ読み込みを大幅に高速化するだけではありません。
“Custom”の名前のとおり、Toolbarにアクションボタンやメニューを追加する拡張機能も備えています。前回の記事ではCustom Tabsを構成するCustomTabsServiceConnection、CustomTabsClient、CustomTabsSessionなど基本的な要素を解説しました。
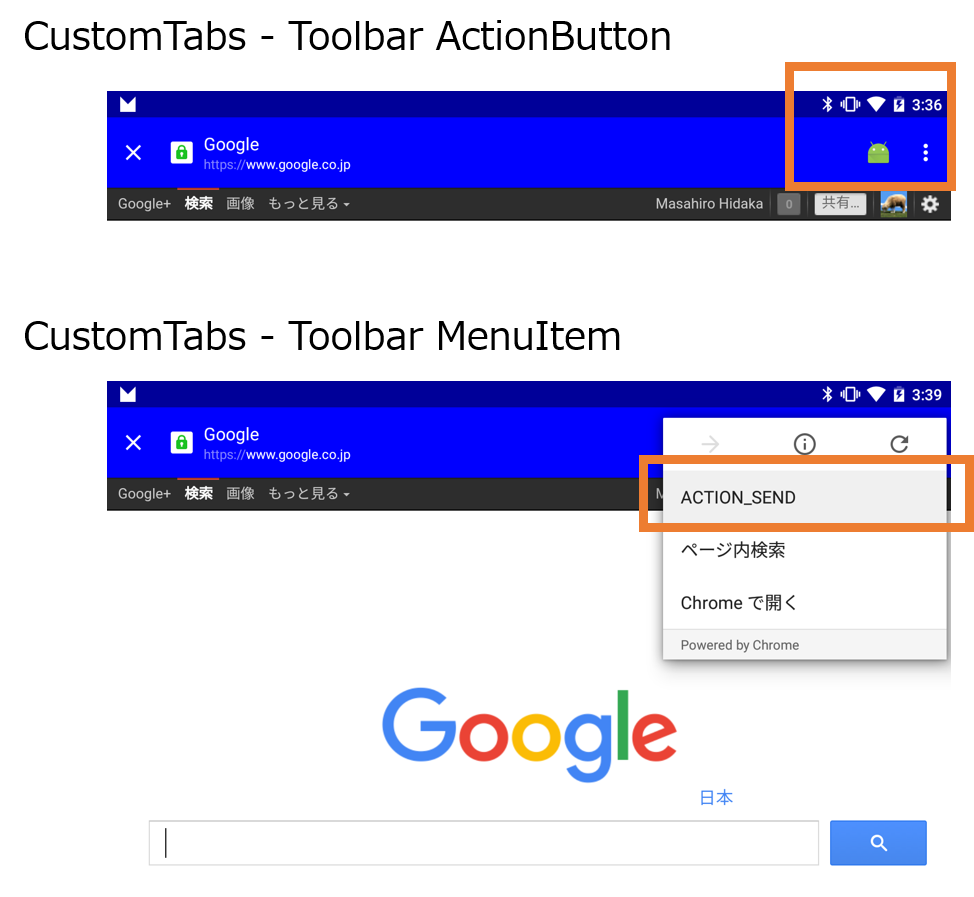
ここでは図で示したようにToolbar上のアクションボタン、メニューの追加方法について解説していきます。サンプルプロジェクトは次のリポジトリからダウンロード可能です。
今回、紹介しているCustomTabsIntent.Builderの機能は次のとおりです。
CustomTabsIntent.Builderの主なメソッド
| メソッド名 | 説明 |
|---|---|
| setToolbarColor | ツールバーの色を設定する |
| setShowTitle | タイトルを表示する |
| setStartAnimations | 開始時アニメーションを指定する |
| setExitAnimations | 終了時アニメーションを指定する |
| setActionButton | アクションボタンを追加する |
| setCloseButtonIcon | Back、クローズボタンを指定する |
| addMenuItem | メニュー項目を追加する |
サンプルコード、解説は続きから。
Support Libraryを使う
Support Library v23ではCustomTabsに対応しています。Android Stduioのプロジェクトに次の設定を行ってください。
■app/guild.gradleのdependenciesに依存パッケージを追加
dependencies {
    compile fileTree(dir: 'libs', include: ['*.jar'])
    testCompile 'junit:junit:4.12'
    compile 'com.android.support:appcompat-v7:23.0.1'
    compile 'com.android.support:customtabs:23.0.1'
}
com.android.support:customtabsをつかうには、サポートライブラリがv23以上である必要があります。エラーが出た場合は、開発環境を更新してください。
CustomTabsを試す準備
ChromeのCustomTabsを使う特徴のひとつにInternetパーミッションが不要である点があります。これはChromeアプリでブラウジングしているためで、アプリが直接インターネットにつなぐわけではないためです。
次のコードは前提となるActivityのコードですが読み飛ばしても影響ありません。画面のボタンをおしたらGoogleを開くサンプルを例に処理を見ていきましょう。
■src/MainActivity.java
public class MainActivity extends AppCompatActivity {

    private String TAG = "CustomTabs";

    @Override
    protected void onCreate(Bundle savedInstanceState) {
        super.onCreate(savedInstanceState);
        setContentView(R.layout.activity_main);

        Button b = (Button) findViewById(R.id.button);
        b.setOnClickListener(new View.OnClickListener() {
            @Override
            public void onClick(View v) {
                // URLをひらく
                lunchCustomTabs("https://google.co.jp/");
                // lunchCustomTabsWithAction("https://google.co.jp/");
                // lunchCustomTabsWithMenuItem("https://google.co.jp/");
            }
        });
    }
    ...省略...
}
CustomTabsを呼び出す処理を、MainActivityのlunchCustomTabsメソッドで行っています。
ブラウジングに使う
次のメソッドはCustomTabsIntent.Builderを使ってCustomTabsIntentを作っています。
ここではToolbarのタイトルや色を指定しています。
■src/MainActivity.java
public class MainActivity extends AppCompatActivity {
    ...省略...
    private void lunchCustomTabs(String url) {
        // ビルダーを使って表示方法を指定する
        CustomTabsIntent.Builder builder = new CustomTabsIntent.Builder();
        builder.setToolbarColor(Color.BLUE).setShowTitle(true);
        builder.setStartAnimations(this, R.anim.slide_in_right, R.anim.slide_out_left);
        builder.setExitAnimations(this, R.anim.slide_in_left, R.anim.slide_out_right);

        // CustomTabsでURLをひらくIntentを発行
        CustomTabsIntent customTabsIntent = builder.build();
        customTabsIntent.launchUrl(this, Uri.parse(url));
    }
    ...省略...
}
CustomTabsIntent.BuilderがCustomTabsIntentを生成、launchUrlメソッドでChromeブラウザを起動するIntentを発行します。CustomTabsはChromeブラウザのバージョン45以上で実行できる機能ですが、もし端末のChromeが44以下だった場合&Chromeが入っていない場合は、適切に通常のブラウザを呼びます(普通のIntentになります)。開発者自分で判定する必要はありません。
ただし、セッションの維持を必要とする場合は注意してください。サンプルではCustomTabsIntent.Builderの生成には引数を指定していませんが、引数を与えることも可能で、その引数がセッション情報です。たとえば、OAuth認証に使う、ログイン処理を伴う場合、またはショッピングカートのようにこの後も処理を継続する場合(=セッションを保存し続ける必要がある)は、セッションをアプリ側で保存する必要があります。
セッション情報をもつCustomTabsSessionは前回の記事でActivityに保持しているので興味があれば確認してみてください。
アクションボタンを追加する

CustomTabsでは、クローズボタンやアクションボタンを追加できます。次のコードはアクションボタンを追加して、押したら暗黙的インテントを発行する例です。
■src/MainActivity.java
public class MainActivity extends AppCompatActivity {
    ...省略...
    private void lunchCustomTabsWithAction(String url) {

        // ビルダーを使って表示方法を指定する
        CustomTabsIntent.Builder builder = new CustomTabsIntent.Builder();
        builder.setToolbarColor(Color.BLUE).setShowTitle(true);
        builder.setStartAnimations(this, R.anim.slide_in_right, R.anim.slide_out_left);
        builder.setExitAnimations(this, R.anim.slide_in_left, R.anim.slide_out_right);

        // アクションボタン押下時に発行するIntent
        Intent intent = new Intent(this, MainActivity.class);
        intent.putExtra("test", "Action Button Pushed!");
        // PendingIntentを用意する
        PendingIntent pendingIntent = PendingIntent.getActivity(this, 0 /* REQUEST_CODE */, intent, 0 /* flags */);
        Bitmap icon = BitmapFactory.decodeResource(getResources(), R.mipmap.ic_launcher);
        builder.setActionButton(icon, "action", pendingIntent);

        // CustomTabsでURLをひらくIntentを発行
        CustomTabsIntent customTabsIntent = builder.build();
        customTabsIntent.launchUrl(this, Uri.parse(url));
    }
    ...省略...
}
CustomTabsIntent.BuilderのsetActionButtonメソッドで追加しています。アクションボタンにはアイコン、名前、実行時のPendingIntentを含めることができます。PendingIntentはNotificationなどでもお馴染みの通知機能です。設定完了後、CustomTabsIntentを生成、launchUrlメソッドでURLを読み込みます。
またサンプルでは例示していませんが、クローズボタンを追加する場合はsetCloseButtonIconメソッドを利用します。こちらも引数はアイコン用のリソースだけのシンプルなメソッドです。
メニューアイテムを追加する
最後にCustomTabsのToolbarにメニュー項目を追加する方法を解説します。
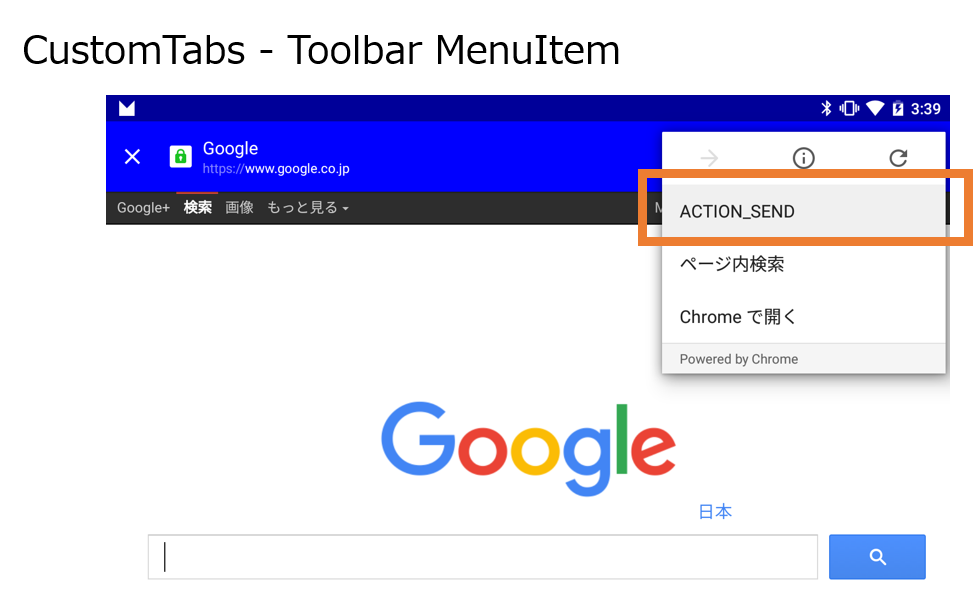
メニューの追加もアクションボタンの追加と同じく、CustomTabsIntent.Builderを利用します。
■src/MainActivity.java
public class MainActivity extends AppCompatActivity {
    ...省略...
    private void lunchCustomTabsWithMenuItem(String url) {

        // ビルダーを使って表示方法を指定する
        CustomTabsIntent.Builder builder = new CustomTabsIntent.Builder();
        builder.setToolbarColor(Color.BLUE).setShowTitle(true);
        builder.setStartAnimations(this, R.anim.slide_in_right, R.anim.slide_out_left);
        builder.setExitAnimations(this, R.anim.slide_in_left, R.anim.slide_out_right);

        // メニュー押下のときのIntentをpendingIntentにいれて設定
        Intent intent = new Intent(Intent.ACTION_SEND);
        intent.setType("text/plain");
        intent.putExtra(Intent.EXTRA_TEXT, "Send from Chrome Custom Tabs!");
        // PendingIntentを用意する
        PendingIntent pendingIntent = PendingIntent.getActivity(this, 0 /* REQUEST_CODE */, intent, 0 /* flags */);
        builder.addMenuItem("ACTION_SEND", pendingIntent);

        // CustomTabsでURLをひらくIntentを発行
        CustomTabsIntent customTabsIntent = builder.build();
        customTabsIntent.launchUrl(this, Uri.parse(url));
    }
    ...省略...
}
CustomTabsIntent.BuilderのaddMenuItemメソッドを使い、メニュー項目を追加します。表示する文字列および押された時に実行するPendingIntentを指定します。ここではACTION_SENDと表示して、押されたら文字列を共有するIntentを発行しています。
実際にメニューを追加する際は、遷移したURLから先、どのような操作をしたか情報が得られない(通常のブラウザなのでリンクが有効なら遷移する)ためアプリ固有の遷移先をメニューに埋め込むことになるでしょう(設定やトップに戻る、一覧表示など)。
CustomTabsは、簡単に使えるだけでなく、高速化やログイン情報などをWebブラウザと共有できる利点があります(WebViewを使うとログインしているはずのサービスで2度目のログインを要求されるなど誰しも経験していそうですね)。
また、ちゃんと作っていてもWebViewを使っていると自由度が高い反面、ユーザの行動をトラッキングしているのでは?という不要な疑惑も生まれがちでした。CustomTabは、このようなセキュリティ上の懸念を除外しつつ高速化などの恩恵を受けられる機能といえます。現時点では最新のChrome v45が必要ですが、浸透していくにしたがって強力な選択肢となるでしょう。
以上、おつかれさまでした。
About The Author
ひつじ(mhidaka)
Software Engineerだよ。DroidKaigi Organizer / Androidと組込とRe:VIEW。techbooster主宰。mhidaka's writings http://booklog.jp/users/mhidaka 技術書典! http://techbookfest.org