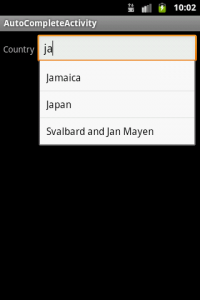
AutoCompleteを使う
AutoCompleteTextViewを使うと、オートコンプリート機能でテキスト入力を支援することができます。Widgetの1つで、名前の通り、TextViewの付加機能として実装されています。

AutoCompleteTextViewクラスのメソッドのうち
- setAdapter(T adapter) ドロップダウンに表示するリストを設定
- setCompletionHint(Char) ドロップダウンリスト最下段に表示されるヒント
- setThreshold(int) オートコンプリート開始までの文字数(0以下は指定できない)
などを使うことで細かい制御が可能です。
ActivityのLayout構成
res/layout/main.xml
<?xml version="1.0" encoding="utf-8"?>
<LinearLayout xmlns:android="http://schemas.android.com/apk/res/android"
    android:orientation="horizontal"
    android:layout_width="fill_parent"
    android:layout_height="wrap_content"
    android:padding="5dp">
    <TextView
        android:layout_width="wrap_content"
        android:layout_height="wrap_content"
        android:text="Country" />
    <AutoCompleteTextView android:id="@+id/autocomplete_country"
        android:layout_width="fill_parent"
        android:layout_height="wrap_content"
        android:layout_marginLeft="5dp"/>
</LinearLayout>
サンプルとして2つのTextViewを配置します。TextViewで、Countryと表示してAutoCompleteTextView での入力を促します。
AutoCompleteTextViewの設定
オートコンプリート時には、ドロップダウンリストから候補を選択すると、入力が補完されます。
はじめに、オートコンプリートで表示する候補となるドロップダウンリストのレイアウトを作成します。
res/layout/list_item.xml
<?xml version="1.0" encoding="utf-8"?>
<TextView xmlns:android="http://schemas.android.com/apk/res/android"
    android:layout_width="fill_parent"
    android:layout_height="fill_parent"
    android:padding="10dp"
    android:textSize="16sp"
    android:textColor="#000">
</TextView>
ソースコード自体の記述も非常に簡単です。
public class AutoCompleteActivity extends Activity {
    /** Called when the activity is first created. */
    @Override
    public void onCreate(Bundle savedInstanceState) {
        super.onCreate(savedInstanceState);
        setContentView(R.layout.main);

        AutoCompleteTextView textView = (AutoCompleteTextView) findViewById(R.id.autocomplete_country);
        ArrayAdapter<String> adapter = new ArrayAdapter<String>(this, R.layout.list_item, COUNTRIES);
        textView.setAdapter(adapter);
    }
8行目のAutoCompleteTextViewに対して、9行目で、ArrayAdapterドロップダウンリストで表示する国名の候補を用意します。
候補の一覧は”COUNTRIES”となっていますが、これは
    static final String[] COUNTRIES = new String[] {
    	  "Afghanistan", "Albania", "Algeria", "American Samoa", "Andorra",
    	  "Angola", "Anguilla", "Antarctica", "Antigua and Barbuda", "Argentina",
    	  "Armenia", "Aruba", "Australia", "Austria", "Azerbaijan",
    	  "Bahrain", "Bangladesh", "Barbados", "Belarus", "Belgium",
    ・・・省略・・・
のように自分で作成する必要があります。今回はstatic finla Stringとして固定していますが、ドロップダウンリストの候補を可変長に変えることも可能です(都度、AutoCompleteTextView#setAdapterが必要です)。
オートコンプリートの条件設定
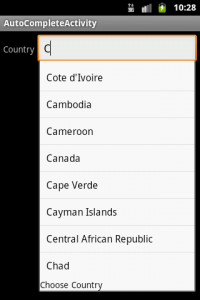
        //ドロップダウンリスト最下段に表示されるヒント
        textView.setCompletionHint("Choose Country");
        //オートコンプリート開始までの文字数(0以下は指定できない)
        textView.setThreshold(1);
最下段にヒントを表示、オートコンプリート開始までの遊び文字数など、細かい制御も可能です。
上記のsetCompletionHint, setThresholdを含んだAutoCompleteTextViewの主要なメソッドは以下の通りです。
- setAdapter(T adapter) ドロップダウンに表示するリストを設定
- setCompletionHint(Char) ドロップダウンリスト最下段に表示されるヒント
- setThreshold(int) オートコンプリート開始までの文字数(0以下は指定できない)
- setDropDownAnchor(int) アンカーにつかうViewのIDを指定
- setDropDownHeight(int) ドロップダウンリストの高さ(MATCH_PARENT or WRAP_CONTENT)
- setDropDownWidth(int) ドロップダウンリストの幅(MATCH_PARENT or WRAP_CONTENT)
- setDropDownBackgroundResource(int) 背景リソースの指定(R.drawable.???)
One Comment
