Androidでは、複数の選択肢の中からデータを選択するために便利なウィジェットが多数存在します。
以前、TechBoosterでは、ListViewについて紹介しました。
リストビュー(ListView)を使う/Getting started
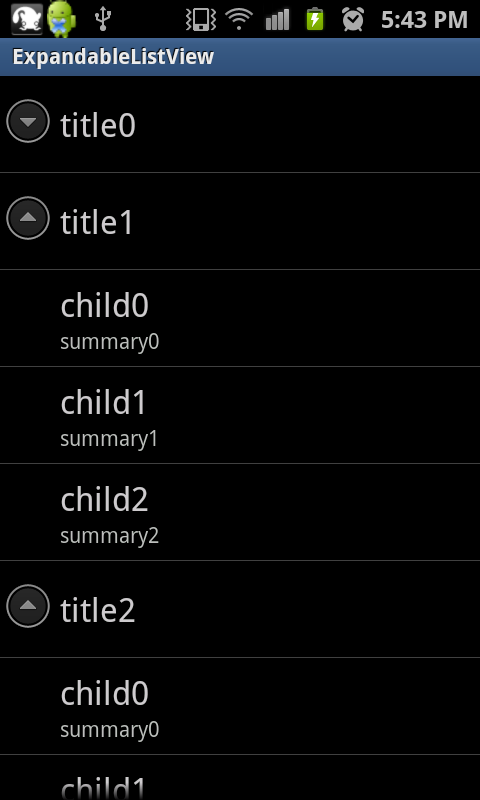
ListViewは、データの一覧をズラッと表示するのに便利ですが、情報が多くなると、欲しい情報がどこにあるかわかりにくくなってしまいがちです。
そこで今回は右の図のような、データをカテゴリ等に分類し、展開したり折りたたんだりできるExpandableListViewについて解説します。
ExpandableListViewを使う際に便利なメソッド
ExpandableListViewでは、イカのメソッドを使うと便利です。
[table “169” not found /]
それでは続きをどうぞ。
リストの項目がクリックされた時の処理
リストの項目がクリックされた時の処理を作るには、ExpandableListViewインスタンスに登録するOnChildClickListenerインターフェースのonChildClickメソッドを使います。
具体的には、イカのようにします。
■src/ExpandableListViewActivity.java
ExpandableListView lv = (ExpandableListView) findViewById(R.id.expandableListView1);
lv.setOnChildClickListener(new OnChildClickListener() {
	@Override
	public boolean onChildClick(ExpandableListView parent, View v,
			int groupPosition, int childPosition, long id) {

	/*****ここにクリックされた時の処理を書く*****/

		return false;
	}
});
2行目でExpandableListViewにOnChildClickListenerをセットし、3,4行目でonChildClickをオーバーライドしています。
リストの項目がクリックされた時の処理は、onChildClickメソッドの中に記述します。
onChildClickメソッドの引数は、それぞれイカのようになっています。
[table “168” not found /]
第1引数のparentから、クリックされた場所の情報を取得することができます。
具体的にはイカのようにします。
■src/ExpandableListViewActivity.java
public boolean onChildClick(ExpandableListView parent, View view,
					int groupPosition, int childPosition, long id) {
	//クリックされた場所が持っている情報を取得
	ExpandableListAdapter adapter = parent.getExpandableListAdapter();

	// クリックされた場所の情報の詳細を取得
	Map<String, String> item = (Map<String, String>) adapter.getChild(groupPosition, childPosition);
	}
});
4行目で、クリックされた場所が持っている情報(Adapter)を取得しています。
7行目で、ExpandableListAdapterクラスのgetChildメソッドを用いて、Adapterの持っている詳細内容を取得しています。
Mapとは
Mapとは、 キーと要素のペアで構成されるデータ構造を保持するインターフェースです。
例えば、「Android1.6」というキーに対する要素が「Donuts」といったように、キーと要素がペアになっているデータ構造です。
Map
グループの親項目がクリックされた時の処理
ExpandableListViewは上述の通り、展開したり折りたたんだりできるリストです。
展開したり折りたたんだりするには、グループの親項目を選択することで行えます。
グループの親項目が選択された時に同時に何かの処理をさせることも可能で、ExpandableListViewインスタンスに登録するOnGroupClickListenerインターフェースのonGroupClickメソッドを使います。
具体的には、イカのようにします。
■src/ExpandableListViewActivity.java
ExpandableListView lv = (ExpandableListView) findViewById(R.id.expandableListView1);
lv.setOnGroupClickListener(new OnGroupClickListener() {
	@Override
	public boolean onGroupClick(ExpandableListView parent, View v,
			int groupPosition, long id) {

		/*****ここにグループの親項目が選択された時の処理を書く*****/

		return false;
	}
});
リスト項目が選択された時のonChildClickメソッドと同様に、2行目でExpandableListViewにOnGroupClickListenerをセットし、3,4行目でonGroupClickをオーバーライドしています。
onGroupClickメソッドの引数も、childPositionが無いだけで、onChildClickメソッドとほぼ同じです。
[table “170” not found /]
それではこれらのメソッドを用いて、サンプルプログラムを作ってみましょう。
サンプルプログラム
ExpandableListViewを作成するには様々な方法がありますが、今回は最も基本的な
ExpandableListViewを持ったレイアウト
まず、ExpandalbeListViewを持ったレイアウトを作成します。
今回は、レイアウト画面のXMLをイカのようにします。
■res/main.xml
<?xml version="1.0" encoding="utf-8"?>
<LinearLayout xmlns:android="http://schemas.android.com/apk/res/android"
    android:layout_width="fill_parent"
    android:layout_height="fill_parent"
    android:orientation="vertical" >
    <ExpandableListView
        android:id="@+id/expandableListView1"
        android:layout_width="fill_parent"
        android:layout_height="wrap_content" >
    </ExpandableListView>
</LinearLayout>
ExpandableListViewを使用したActivity
次に、Activityを作成します。
ExpandableListViewで情報を表示するには、SimpleExpandableListAdapterを使います。
SimpleExpandableListAdapterとは、ArrayAdapterクラスと同様で、データの一覧をViewに渡すために使う、箱のようなクラスです。
SimpleExpandableListAdapterを使用することで、簡単にExpandableListViewへデータを渡すことができます。
まず、リストとして表示したい情報をSimpleExpandableListAdapterへ情報を格納するために、表示したい情報のMapを作成します。
手順はイカのようにします。
- グループの親項目用のMapを作る
- リスト項目として表示したい子要素全体用のMapを作る
- グループの親項目用のMapに情報を格納する
- 各グループ別のリスト項目用のMapを作る
- 各グループ別のリスト項目用のMapに情報を格納する
- 子要素全体用のMapに、各グループ別のリスト項目用Mapを格納する
- グループの親項目用のMapと、子要素全体用のMapをSimpleExpandableListAdapterへ格納する
実際にコードで見てみましょう。
SimpleExpandableListAdapterクラスのコンストラクタはイカのようになっています。
SimpleExpandableListAdapter (Context context, List<? extends Map<String, ?>> groupData, int groupLayout, String[] groupFrom, int[] groupTo, List<? extends List<? extends Map<String, ?>>> childData, int childLayout, String[] childFrom, int[] childTo);[table “171” not found /]
各データの格納
まず、グループの親項目用のMapに、表示したい内容を格納します。
具体的にはイカのようにします。
■src/ExpandableListViewActivity.java
int PARENT_DATA = 3;
// 親ノードのリスト
List<Map<String, String>> parentList = new ArrayList<Map<String, String>>();
// 親ノードに表示する内容を生成
for (int i = 0; i < PARENT_DATA; i++) {
	Map<String, String> parentData = new HashMap<String, String>();
	parentData.put("title", "title" + Integer.toString(i));
	// 親ノードのリストに内容を格納
	parentList.add(parentData);
}
7行目で内容を格納しています。
次に、子要素となる内容を格納します。
■src/ExpandableListViewActivity.java
int CHILD_DATA = 3;
// 全体の子ノードのリスト
List<List<Map<String, String>>> allChildList = new ArrayList<List<Map<String, String>>>();

// 子要素として表示する文字を生成
for (int i = 0; i < PARENT_DATA; i++) {
	// 子要素全体用のリスト
	List<Map<String, String>> childList = new ArrayList<Map<String, String>>();

	// 各子ノード用データ格納
	for (int j = 0; j < 3; j++) {
		Map<String, String> childData = new HashMap<String, String>();
		childData.put("TITLE", "child" + Integer.toString(j));
		childData.put("SUMMARY", "summary" + Integer.toString(j));
		// 子ノードのリストに文字を格納
		childList.add(childData);
	}
	// 全体の子ノードリストに各小ノードリストのデータを格納
	allChildList.add(childList);
}
13, 14行目で表示したい内容を格納し、それらを19行目で子要素全体用のリストに格納しています。
それでは、ソースコードを全体で見てみましょう。
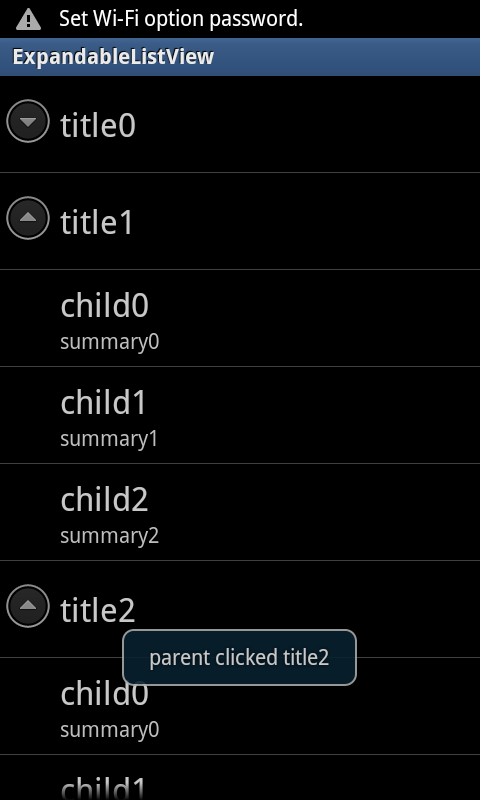
今回は、グループの親ノードがクリックされた時と子要素がクリックされた時に、クリックされた場所の情報をトーストで表示するようにしました。
■src/ExpandableListViewActivity.java
public class ExpandableListViewActivity extends Activity {
	int PARENT_DATA = 3;
	int CHILD_DATA = 3;

	/** Called when the activity is first created. */
	@Override
	public void onCreate(Bundle savedInstanceState) {
		super.onCreate(savedInstanceState);
		setContentView(R.layout.main);

		// 親ノードのリスト
		List<Map<String, String>> parentList = new ArrayList<Map<String, String>>();
		// 全体の子ノードのリスト
		List<List<Map<String, String>>> allChildList = new ArrayList<List<Map<String, String>>>();

		// 親ノードに表示する内容を生成
		for (int i = 0; i < PARENT_DATA; i++) {
			Map<String, String> parentData = new HashMap<String, String>();
			parentData.put("title", "title" + Integer.toString(i));
			// 親ノードのリストに内容を格納
			parentList.add(parentData);
		}

		// 子ノードに表示する文字を生成
		for (int i = 0; i < PARENT_DATA; i++) {
			// 子ノード全体用のリスト
			List<Map<String, String>> childList = new ArrayList<Map<String, String>>();

			// 各子ノード用データ格納
			for (int j = 0; j < 3; j++) {
				Map<String, String> childData = new HashMap<String, String>();
				childData.put("TITLE", "child" + Integer.toString(j));
				childData.put("SUMMARY", "summary" + Integer.toString(j));
				// 子ノードのリストに文字を格納
				childList.add(childData);
			}
			// 全体の子ノードリストに各小ノードリストのデータを格納
			allChildList.add(childList);
		}

		// アダプタを作る
		SimpleExpandableListAdapter adapter = new SimpleExpandableListAdapter(
				this, parentList,
				android.R.layout.simple_expandable_list_item_1,
				new String[] { "title" }, new int[] { android.R.id.text1 },
				allChildList, android.R.layout.simple_expandable_list_item_2,
				new String[] { "TITLE", "SUMMARY" }, new int[] {
						android.R.id.text1, android.R.id.text2 });

		ExpandableListView lv = (ExpandableListView) findViewById(R.id.expandableListView1);
		//生成した情報をセット
		lv.setAdapter(adapter);

		// リスト項目がクリックされた時の処理
		lv.setOnChildClickListener(new OnChildClickListener() {
			@Override
			public boolean onChildClick(ExpandableListView parent, View view,
					int groupPosition, int childPosition, long id) {
				ExpandableListAdapter adapter = parent
						.getExpandableListAdapter();

				// クリックされた場所の内容情報を取得
				Map<String, String> item = (Map<String, String>) adapter
						.getChild(groupPosition, childPosition);

				// トーストとして表示
				Toast.makeText(
						getApplicationContext(),
						"child clicked " + item.get("TITLE") + " "
								+ item.get("SUMMARY"), Toast.LENGTH_LONG)
						.show();
				return false;
			}
		});

		// グループの親項目がクリックされた時の処理
		lv.setOnGroupClickListener(new OnGroupClickListener() {
			@Override
			public boolean onGroupClick(ExpandableListView parent, View view,
					int groupPosition, long id) {

				ExpandableListAdapter adapter = parent
						.getExpandableListAdapter();

				// クリックされた場所の内容情報を取得
				Map<String, String> item = (Map<String, String>) adapter
						.getGroup(groupPosition);
				// トーストとして表示
				Toast.makeText(getApplicationContext(),
						"parent clicked " + item.get("title"),
						Toast.LENGTH_LONG).show();
				return false;
			}
		});
	}
}
以上、お疲れ様でした。