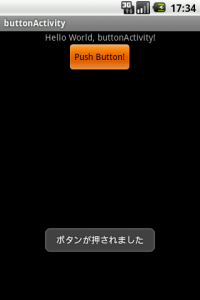
Buttonのイベント(onClickListener、クリック処理)を受ける
ボタンの背景をダイナミックに変えるでは、背景の変え方について触れました。
今回は、ボタンへ、イベントを追加する方法について紹介します。

<Button
    android:text="@string/button"
    android:id="@+id/Button01"
    android:layout_width="wrap_content" android:layout_height="wrap_content"
    android:layout_gravity="center" />
キーワードはsetContentView、findViewById、setOnClickListener、Activity implements OnClickListenerなどです。
レイアウトファイルにボタンを配置して、リスナーを登録する部分を続きに解説しました。
レイアウトファイルにボタンを配置する
res/layout/main.xmlに、ボタンを配置します。
<?xml version="1.0" encoding="utf-8"?>
<LinearLayout xmlns:android="http://schemas.android.com/apk/res/android"
    android:orientation="vertical"
    android:layout_width="match_parent"
    android:layout_height="match_parent"
    android:layout_gravity="center"
    >

<TextView
    android:layout_width="match_parent"
    android:layout_height="wrap_content"
    android:text="@string/hello" android:gravity="center"/>

<Button
    android:text="@string/button"
    android:id="@+id/Button01"
    android:layout_width="wrap_content" android:layout_height="wrap_content"
    android:layout_gravity="center" />

</LinearLayout>
TextView(“Hello World, buttonActivity!”)と
Button(“Push Button!”)のみのシンプルな画面です。
少し工夫してボタンの表示位置をセンタリングしています(android:layout_gravity属性)。
# レイアウトについては、また別の機会に。
ButtonにIDを付与する
ボタンにID(R.id.Button01)を付与しています。
IDは特殊な記法(@+)で追加することが出来ます。任意のオブジェクトに追加しておけば
java上から呼び出しやすいです。
Activity内部では、IDからButtonを取得します。
    public void onCreate(Bundle savedInstanceState) {
        super.onCreate(savedInstanceState);
        setContentView(R.layout.main);

        //buttonを取得
        Button btn = (Button)findViewById(R.id.Button01);
        btn.setOnClickListener(clicked);

    }
findViewByIdメソッドで、IDからViewを逆引きできます。非常に便利な関数です。
ただし、逆引きでるのは読み込み済みのLayoutから、のみです。
setContentView(R.layout.main);
上記コードで、res/layout/main.xmlが読み込まれます。main.xmlの中にR.id.Button01が存在しない場合、エラーです。
実際にコーディングしていても、「なぜか使えない?」と、ハマるポイントです。
Buttonイベントの登録
前項で取得したButtonに対して、リスナーを登録します。
btn.setOnClickListener(clicked);
リスナーの登録の仕方はいくつかありますが、
一番素直なのが、View.OnClickListener として自分で実装してしまうことです。
private View.OnClickListener clicked = new View.OnClickListener() {

public void onClick(View v) {
// TODO 自動生成されたメソッド・スタブ

Log.v("Button","onClick");
}
};
インターフェイスの実装 implementsを使う
implementsをつかえば更に簡単に記述できます。
public class buttonActivity extends Activity implements OnClickListener{
    /** Called when the activity is first created. */
    @Override
    public void onCreate(Bundle savedInstanceState) {
        super.onCreate(savedInstanceState);
        setContentView(R.layout.main);

        //buttonを取得
        Button btn = (Button)findViewById(R.id.Button01);
        btn.setOnClickListener(this);

    }
    //インターフェイスを実装 implements OnClickListener
    public void onClick(View v) {
    	// TODO 自動生成されたメソッド・スタブ
    	Toast.makeText(this, R.string.message , Toast.LENGTH_LONG).show();
	}
サンプルコードは、Activityクラスに、インターフェイス”OnClickListener”を実装しています。
ボタンのOnClickListenerは、前回、clicked(private View.OnClickListener clickedでした。
今回は、thisを指定して、アクティビティにOnClickListenerを追加しました。