AppWidgetの作成(1)
AppWidget(ウィジット,ウィジェット)とはホーム画面(ホームスクリーン)に常駐する形のアプリです。※以下,Widgetと記述します
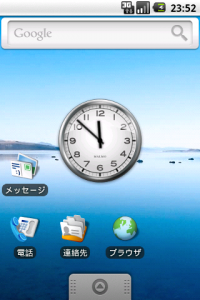
おなじみなのが初期状態で表示されている検索バーでしょうか。他に最初からインストールされているWidgetにはアナログ時計などがあります。
Widgetに必要なものは下記の通りです。
- 通常のアプリケーションと同様にレイアウトを定義したXMLファイル
- Widgetの描画サイズや更新時間などを記述したXMLファイル
- 実際の処理を行うAppWidgetProviderクラスを継承したクラス
もちろんこれに加えてAndroidManifestファイルも必要です。
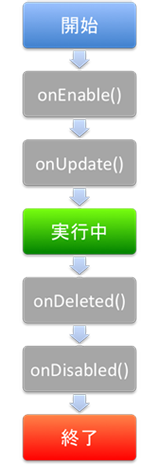
また、Activityと同じようにWidgetにもライフサイクルが存在します。ライフサイクルを意識することも重要です。
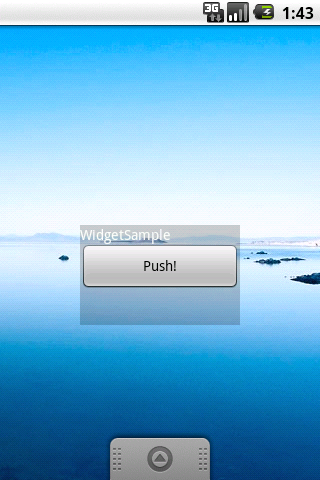
では、今回は文字とボタンが表示されるだけのWidgetを作成してみます。
まずはプロジェクトを作成します。
通常のアプリケーションと同じように作成しますが今回はActivityは不要なのでCreateActivityのチェックは外します。
レイアウト作成
次にレイアウトの定義ファイルを作成します。 こちらも通常のアプリケーションと大差はないのですが注意する点があります。
使用することができるレイアウトが限定されています。
- Linearlayout
- FrameLayout
- RelativeLayout
今回はmain.xmlにTextViewとButtonを1つずつ記述します。
<?xml version="1.0" encoding="utf-8"?>
<LinearLayout
    xmlns:android="http://schemas.android.com/apk/res/android"
    android:layout_width="fill_parent"
    android:layout_height="fill_parent"
    android:background="#33000000"
    android:orientation="vertical">
    <TextView
        android:id="@+id/text"
        android:layout_width="fill_parent"
        android:layout_height="wrap_content"
        android:text="WidgetSample"
        android:textColor="#ffffffff"
        />
    <Button
        android:id="@+id/button"
        android:layout_width="fill_parent"
        android:layout_height="wrap_content"
        android:text="Push!"
        />
</LinearLayout>
設定ファイル作成
設定ファイルに記述すべき項目は4つあります。
- android:minWidth:Widgetの幅(単位:dip)
- android:minHeight:Widgetの高さ(単位:dip)
- android:initialLayout:Widgetの初期レイアウト
- android:updatePeriodMillis:Widgetの更新間隔(単位:ms) ただし0の場合は更新しない
幅と高さはピクセルではなく、dipという単位で指定します。
画面を4×4に分割したセル単位で考えます。分割された1セルのサイズは74dipです。
これだと単純に必要なセルx74(dip)すれば良いように思えますが、実サイズ計算時に丸め誤差が発生するため、2を引く必要があります。
dip = (占有するセル数 x 74dip) – 2dip
この仕組みによって、画面サイズが異なる端末でも同じように表示することが可能になります。
今回は縦1セル、横2セルを占有するWidgetを作ろうと思うので
1×74 – 2 = 72dip
2×74 – 2 = 146dip
と指定します。
resの下にxmlという名のフォルダを作成して設定ファイル(XML)を作ります。今回はwidgetsample.xmlという名前にしています。
<?xml version="1.0" encoding="utf-8"?>
<appwidget-provider
	xmlns:android="http://schemas.android.com/apk/res/android"
	android:initialLayout="@layout/main"
	android:minHeight="72dip"
	android:minWidth="146dip"
	android:updatePeriodMillis="0">
</appwidget-provider>
AndroidManifest.xml
まずは例として、今回のサンプルを。
<?xml version="1.0" encoding="utf-8"?>
<manifest xmlns:android="http://schemas.android.com/apk/res/android"
      package="org.jpn.techbooster.widget"
      android:versionCode="1"
      android:versionName="1.0">
    <application android:icon="@drawable/icon" android:label="@string/app_name">
		<receiver
    		android:name="WidgetSample"
    		android:label="WidgetSample">
    		<intent-filter>
    			<action android:name="android.appwidget.action.APPWIDGET_UPDATE" />
    		</intent-filter>
    		<meta-data
    			android:name="android.appwidget.provider"
    			android:resource="@xml/widgetsample"
    			/>
    	</receiver>

    </application>
    <uses-sdk android:minSdkVersion="4" />

</manifest>
重要なのが
- <reciver>
- <intent-filter>
- <meta-data>
<reciver>
android:name→AppWidgetProviderを継承したクラス名を記述
android:label→ウィジェットの一覧に表示される名前
<intent-filter>
<action>タグに更新イベントを受け取れることを示すAPPWIDGET_UPDATEを記述
<meta-data>
android:nameにはandroid.appwidget.provider、android:resourceにAppWidgetの設定ファイルを指定
AppWidgetProviderクラスを継承したクラス
実際の処理の実装に入るわけですが、冒頭に書いたようにWidgetもライフサイクルを意識する必要があります。
Widgetは複数起動することができますが、1つ目の起動時にonEnabled()が呼び出されます。その後すぐにonUpdate()が呼び出されます。
そして、もう1つWidgetを起動すると、onEnabled()は呼び出されずにonUpdate()がすぐに呼び出されます。
起動しているWidgetを終了させると、onDeleted()が呼び出されます。
起動しているすべてのWidgetを終了させると、onDisabled()が呼び出されます。
更新期間を指定している場合、指定更新期間ごとにonUpdate()が呼び出されます。
今回はただ表示するだけなので各メソッドをオーバーライドしますが、確認のためログを出力するだけにします。
package org.jpn.techbooster.widget;

import android.appwidget.AppWidgetManager;
import android.appwidget.AppWidgetProvider;
import android.content.Context;
import android.content.Intent;
import android.util.Log;

public class WidgetSample extends AppWidgetProvider {
	private final String TAG = "WidgetSample";

	@Override
	public void onEnabled(Context context) {
		Log.d(TAG, "onEnabled");
		super.onEnabled(context);
	}

	@Override
	public void onUpdate(Context context, AppWidgetManager appWidgetManager,
			int[] appWidgetIds) {
		Log.d(TAG, "onUpdate");
		super.onUpdate(context, appWidgetManager, appWidgetIds);
	}

	@Override
	public void onDeleted(Context context, int[] appWidgetIds) {
		Log.d(TAG, "onDeleted");
		super.onDeleted(context, appWidgetIds);
	}

	@Override
	public void onDisabled(Context context) {
		Log.d(TAG, "onDisabled");
		super.onDisabled(context);
	}

	@Override
	public void onReceive(Context context, Intent intent) {
		Log.d(TAG, "onReceive");
		super.onReceive(context, intent);
	}
}
インストールして、ホーム画面にWidgetを追加してみます。


このままではただ表示しているだけなので、次回はサービスとインテントを利用してボタンを押した際に、Widgetの文字を変更する方法を説明しようと思います。


