layoutoptを用いて、レイアウトを最適化する
Androidでは、XMLファイルを用いて画面レイアウトを作成しますが、layoutoptコマンドを使用することで、作成したレイアウトの構成を静的に解析することが可能です。
今回は、意図的に冗長に作成したサンプルのレイアウトファイル(以下sample_layout.xml)を用意し、layoutoptコマンドによる解析結果を元にして最適化していきたいと思います。
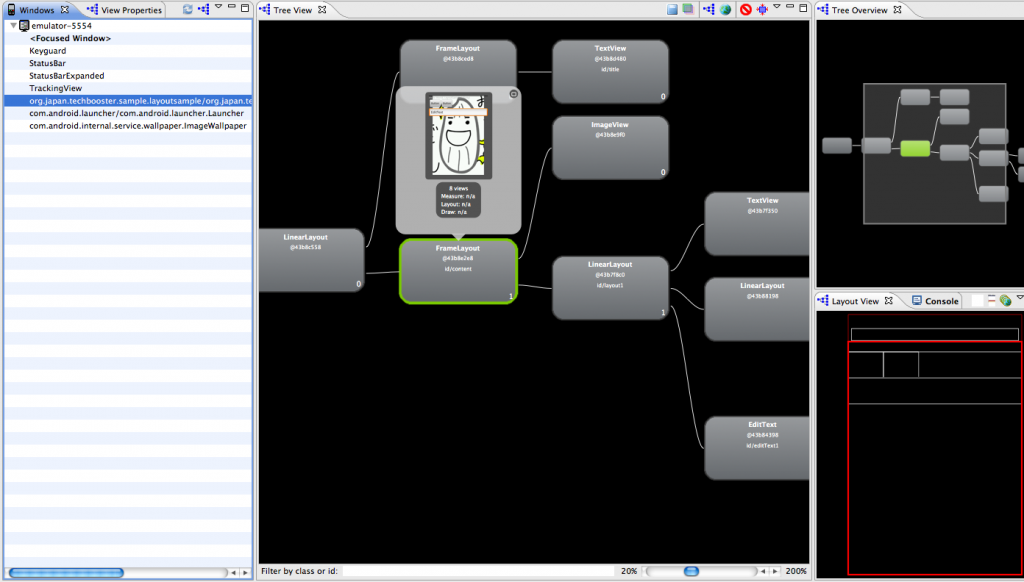
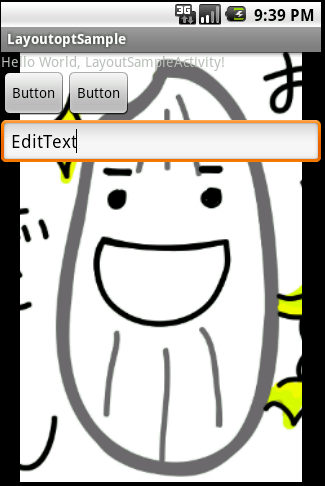
以下は今回最適化する対象のsample_layout.xmlをHierarchy Viewerで見たレイアウトの構造と、それを実行した際の画面キャプチャです。
今回は、レイアウトの構造を視覚的に見る事ができるHierarchy Viewerについても解説していきます。
それでは続きをどうぞ。
Hierarchy Viewerを用いて、現在のViewの構成を確認する
まず、レイアウトファイルを最適化する前に、今回最適化を行う対象のsample_layout.xmlのレイアウト構成を、Hierarchy Viewerを用いて確認してみます。
リスト1 : sample_layout.xml
<?xml version="1.0" encoding="utf-8"?>
<FrameLayout xmlns:android="http://schemas.android.com/apk/res/android"
	android:layout_width="fill_parent" android:layout_height="fill_parent">
	<ImageView android:layout_width="fill_parent"
		android:layout_height="fill_parent" android:src="@drawable/okomedayonn" />
	<LinearLayout android:id="@+id/layout1"
		android:layout_width="fill_parent" android:layout_height="fill_parent"
		android:orientation="vertical">
		<TextView android:layout_width="fill_parent"
			android:layout_height="wrap_content" android:text="@string/hello" />
		<LinearLayout android:layout_width="wrap_content"
			android:layout_height="wrap_content" android:orientation="horizontal">
			<TableLayout android:layout_width="wrap_content"
				android:layout_height="wrap_content" android:stretchColumns="2">
				<TableRow android:baselineAligned="false">
					<Button android:id="@+id/button2" android:layout_height="wrap_content"
						android:layout_width="wrap_content" android:text="Button"
						></Button>
					<Button android:id="@+id/button1" android:text="Button"
						android:layout_width="wrap_content"
						android:layout_height="wrap_content"></Button>
				</TableRow>
			</TableLayout>
		</LinearLayout>
		<EditText android:layout_height="wrap_content" android:id="@+id/editText1"
			android:layout_width="fill_parent" android:text="EditText"></EditText>
	</LinearLayout>
</FrameLayout>
Hierarchy Viewerを利用するには、
- アプリケーションをエミュレータで実行(実機ではルート権限が必要)する
- eclipseの、[Window]→[Open Perspective]→[Hierarchy View]の順で選択して開く
- レイアウトを確認したいパッケージをWindows Viewから選択する。
という手順を踏みます。
今回は、手順3にてサンプルプロジェクトのパッケージ名(org.japan.techbooster.sample.layoutsample)を選択しています。
下図は、Hierarchy ViewerとHierarchy Viewerで見たサンプルプロジェクトのレイアウト(sample_layout.xml)構成です。
真ん中の[Tree View (②)]では、選択されているViewが緑の枠で囲まれ、Viewの様子が表示されます。
左の[View Properties (①)]では、選択されているLinearLayoutの各要素の値を確認することができます。
右上の[Tree Overview (③)]では、レイアウト構造の全体と、[Tree View]に表示されている領域が確認できます。
右下の[Layout View (④)]では、選択されているViewが赤枠で示されます。
Tree Viewの各ボックスを選択すると、このように選択したViewの情報を視覚的に確認することができます。
後に、最適化した後のHierarchy Viewも示しますので、構成をよく見ておいてください。
layoutoptコマンドを使用してレイアウトを最適化する。
それでは、layoutoptコマンドを使用して 、リスト1に示すsample_layout.xmlのレイアウトを静的解析し、解析結果を元にレイアウトを最適化してみましょう。
layoutoptコマンドの使い方は非常に簡単です。
まず、ターミナル(コマンドプロンプト)を立ち上げ、android-sdk/toolsフォルダに移動します(※パスが通っている場合は不要)。
移動したら、 早速layoutoptコマンドを打ち込みます。
オプションには、 sample_layout.xmlファイル(もしくはファイルが格納されているフォルダ)を指定します。(※ layoutフォルダを指定した場合は、格納されているレイアウトファイルをすべてが静的解析の対象になります。)
結果を一つづつ見てみましょう。なお、 最初の数字は、指摘箇所(「始まりの行:終わりの行」)を示しています。
3:28 The root-level <FrameLayout/> can be replaced with <merge/>
これは<FrameLayout>タグを<merge>タグに置き換えることができますよ、という意味になります。
図1のHierarchy Viewを見てみると、選択状態にあるFramelayout(sample_layout.xmlで定義したルートのView)の一階層上に、もう一つFrameLayoutが存在していることが見てわかります。
sample_layout.xmlで定義しているFramelayoutは、widthもheightもfill_parentで定義されているため、一階層上のFrameLayoutは実際には完全に隠れてしまって、意味を成していないことがわかります。つまり、無駄なレイアウト構成ができあがってしまっているわけです。
しかしこのFrameLayoutはAndroid側でデフォルトで定義されているため、こちらで消すことはできません。
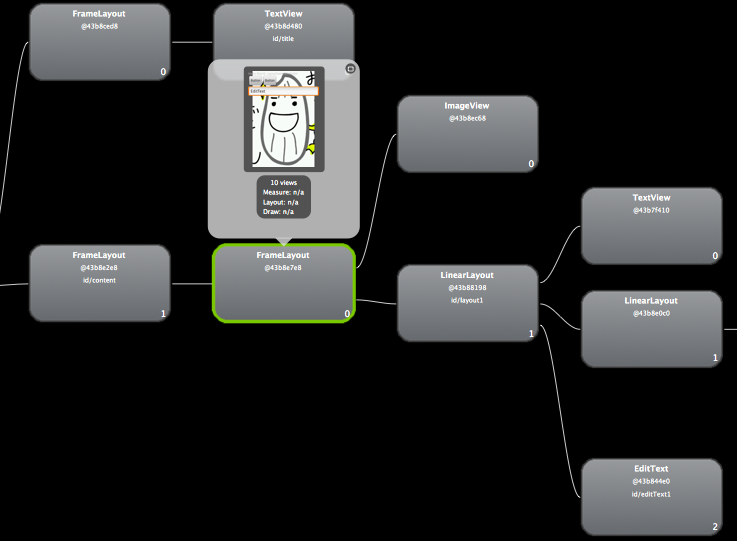
そこで、<merge>タグを使用することで、一階層上のFrameLayoutに、こちらで定義したFrameLayoutをマージ(合体)させます。こうすることで、一階層上のFrameLayoutは無視され、図2に示すように、FrameLayoutは一つとしてみなされます。
14:23 This TableLayout layout or its LinearLayout parent is useless
こちらも同様に、TableLayoutもしくはその親のLinearLayoutが必要ありません、という意味です。ここでは、TableLayoutを取り除いてみます。同時に、以下の指摘にあるTableRowも取り除きます。
15:22 This TableRow layout or its TableLayout parent is useless
さて、以下に修正後のsample_layout_after.xmlを以下に示します。
<?xml version="1.0" encoding="utf-8"?>
<merge xmlns:android="http://schemas.android.com/apk/res/android"
	android:layout_width="fill_parent" android:layout_height="fill_parent">
	<ImageView android:layout_width="fill_parent"
		android:layout_height="fill_parent" android:src="@drawable/okomedayonn" />
	<LinearLayout android:id="@+id/layout1"
		android:layout_width="fill_parent" android:layout_height="fill_parent"
		android:orientation="vertical">
		<TextView android:layout_width="fill_parent"
			android:layout_height="wrap_content" android:text="@string/hello" />
		<LinearLayout android:layout_width="wrap_content"
			android:layout_height="wrap_content" android:orientation="horizontal">
			<Button android:id="@+id/button2" android:layout_height="wrap_content"
				android:layout_width="wrap_content" android:text="Button"></Button>
			<Button android:id="@+id/button1" android:text="Button"
				android:layout_width="wrap_content" android:layout_height="wrap_content"></Button>
		</LinearLayout>
		<EditText android:layout_height="wrap_content" android:id="@+id/editText1"
			android:layout_width="fill_parent" android:text="EditText"></EditText>
	</LinearLayout>
</merge>
それでは再度、sample_layout.xmlに対してlayoutoptコマンドを実行してみましょう。
以下のように、先ほどの指摘事項がすべてなくなりました。
※修正後のレイアウトファイルは、sample_layout_after.xmlとしています。
修正後のHierarchy Viewも見てみましょう。

図2 : 修正後のsample_layout.xmlのHierarchy View
<merge>タグに置き換えたことにより、図1では二つあったFrameLayoutが一つになっていることがわかります。
その他にも、図1では冗長だったTableLayoutがなくなることで階層が減り、レイアウト構成が単純になっています。
以上で、layoutoptを使用したレイアウトの最適化は完了です。
※注意点
layoutoptコマンドで注意しないといけないのは、なんでもかんでも指摘通りに修正してはいけないということです。レイアウト修正中の説明中で、「もしくは」と記述しましたが、実際にはどちらを削除してもよいわけではありません。
また、layoutoptコマンドはあくまでレイアウトの構成を静的に解析してくれるだけであり、実際のレイアウト修正は自分の手で行う必要があります。


